In a nutshell
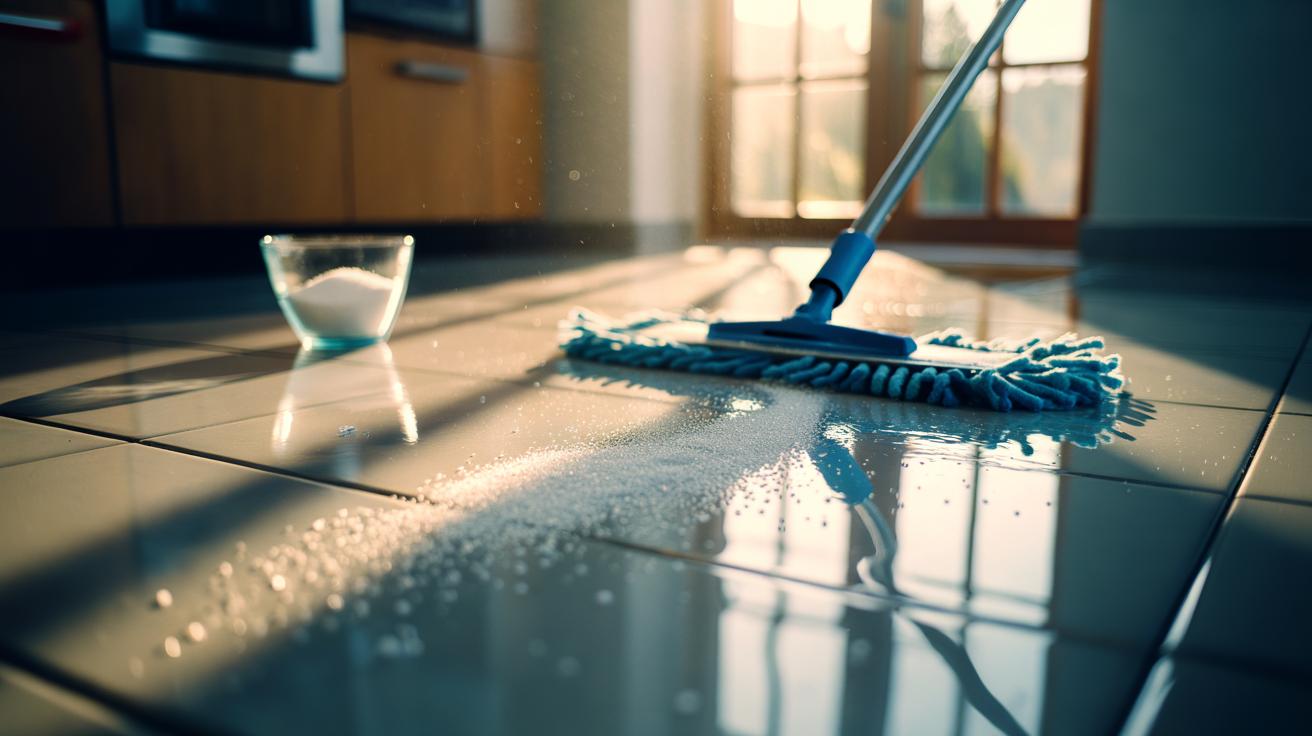
- ⏱️ Transform floors in 2 minutes with salt: lightly mist, sprinkle 1–2 tsp/m², scrub with microfibre, quick rinse and buff for a streak-free, grippy finish.
- 🔬 Why it works: micro-abrasion from crystals and dissolving brine loosen residues while high osmotic pressure hinders microbes—effective on most sealed surfaces.
- 🧭 Surface guidance: adapt dose/pressure for tile, vinyl/LVT, laminate, sealed wood, sealed stone; keep moisture low on laminates, rinse stone promptly, avoid unsealed or waxed wood.
- 🧹 Stains and smells: salt wicks fresh spills (wine, coffee), lifts mud films, reduces pet odours; for heavy grease, add a tiny drop of washing-up liquid, then wipe with clean water.
- 🌍 Safety and savings: low-cost, eco-friendly, unscented; don’t leave brine to dry, keep away from bare metal, never mix bleach with acids, and always spot test first.
Brits love a clever cleaning hack, and this one is almost hiding in plain sight. Reach past the pricey sprays and grab a tub of salt. In kitchens, hallways, and bathrooms, this humble mineral can brighten tiles, tame sticky patches, and leave floors feeling grippy rather than filmy. It works in about two minutes. The trick isn’t magic; it’s smart physics and a little chemistry. Salt lends micro-abrasion without harshness, draws moisture from grime, and helps release odours trapped in damp films. It’s cheap, plastic-light, and refreshingly unscented. Ready to swap suds for simplicity? Here’s how to make salt your fastest floor fix.
Why Salt Works on Floors
The secret is structure. Table salt crystals are tiny, sharp-edged, and water-soluble. Used damp with a microfibre cloth or mop, they act like a gentle scrub—enough bite to lift the dulling film that daily life leaves, not enough to gouge modern finishes. As some crystals dissolve, the light brine helps loosen residues that stick to tiles and vinyl. It’s not a detergent, so don’t expect foam. Instead, salt offers clean, mechanical action: micro-abrasion to dislodge, moisture control to carry soil away.
There’s more. Salt is hostile to many microbes by creating a high-osmotic environment. That makes it a handy companion in kitchens where spills can feed bacteria and odours. On floors, a brief salt swipe can reduce that clammy, slightly greasy feel without leaving a perfumed trail. Used correctly, it’s friendly to most sealed surfaces, from ceramic and porcelain to sealed wood and laminate. The caveat: avoid grinding dry crystals into soft or unsealed finishes. If you’re worried about scratching, swap to finer table salt, dampen first, and test in a corner. Simple, effective, and surprisingly thorough.
The Two-Minute Salt Method
Clock it. You’ll need a microfibre pad or cloth, fine table salt, and warm water in a spray bottle or a damp bucket. Sweep or vacuum the worst grit first—ten seconds is enough for a patch. For everyday refresh, a small area method is fastest.
0:00–0:30 Prep. Lightly mist the target area with warm water. Sprinkle around 1–2 teaspoons of salt per square metre, or make a quick slurry in a cup: 250 ml warm water + 1 teaspoon salt. Damp is key. Don’t scatter salt dry and grind it in.
0:30–1:30 Action. Glide the microfibre over the area with short, firm strokes. You’ll feel the drag lessen as the film lifts. Sticky heel marks, tea splashes, pet paw prints—gone. If the mop feels sandy, you’ve added too much; mist again to dissolve and keep moving.
1:30–2:00 Finish. Rinse the pad, quick final pass with clean water, then buff with a dry cloth for a streak-free sheen. On larger rooms, work in small squares and repeat. For greasy kitchens, you can add a single drop of mild washing-up liquid to the slurry, but the salt alone often restores grip and clarity faster than you expect.
Surface-by-Surface Guidance
Different floors, same principle—damp micro-abrasion and swift removal. The table below offers quick cues so you can adapt confidently. Always test discreetly and keep contact time short on delicate materials.
| Surface | Salt Amount | Technique | Notes |
|---|---|---|---|
| Ceramic/Porcelain Tile | 1–2 tsp/m² | Damp sprinkle, short strokes | Rinse to prevent light residue in grout. |
| Vinyl/LVT | 1 tsp/m² | Salt slurry on microfibre | Avoid abrasive pads; minimal pressure. |
| Laminate | 1 tsp/m² | Mist + salt, quick wipe | Keep moisture low to protect seams. |
| Sealed Wood | ½–1 tsp/m² | Fine salt slurry, fast buff | Never use on unsealed or waxed wood. |
| Natural Stone (sealed) | ½ tsp/m² | Very brief contact, rinse | Do not let brine dry on stone. |
On all surfaces, the golden rule holds: dampen, agitate, remove. The aim is to mobilise grime then get it off the floor quickly. That’s why this routine is so fast. You’re not soaking; you’re targeting. Keep a second cloth handy to dry wherever footprints appear, and you’ll lock in a crisp, non-smeary finish.
Stains, Smells, and Safety Notes
Fresh spills? Pour a light veil of salt on wine, coffee, or sauce. It draws out moisture, buys time, and stops the stain from spreading while you fetch the microfibre. For mud and street grit, salt excels as a low-scratch scrub to detach the dusty film that dulls tiles and vinyl. Pet odours often cling to damp patches—salt helps by absorbing moisture and nudging volatile smells out of the surface layer. Follow with a clean-water wipe so no brine remains.
Safety is simple. Don’t leave salt or saltwater to dry on natural stone; rinse and dry promptly. Keep salt away from bare metal chair feet or steel thresholds to avoid corrosion if puddles linger. On timber, ensure the finish is intact and keep moisture minimal. While table salt is non-toxic, discourage pets from licking concentrated brine and store tubs out of reach. If you use other cleaners, never mix bleach with acids like vinegar. For heavy, baked-on grease, a tiny drop of washing-up liquid with salt offers extra lift, but use sparingly to preserve that non-film feel. Think gentle, fast, and controlled.
With a spoon of salt and a damp microfibre, you can revive floors before the kettle boils. Less plastic, fewer perfumes, more grip underfoot. It’s a pocket-sized routine that sidesteps long mopping sessions and still delivers that clear, bright look households crave. Try it on a small square today, then scale up once you’ve felt the difference. Your shoes will stop squeaking, and the room will smell like nothing at all—clean, not covered. What corner of your home will you transform first with this two-minute salt sweep?
Did you like it?4.6/5 (25)